Opening a Window
Creating a canvas
In OSGL, a Window is an EditableImage. OSGL is wrapper around this EditableImage that gives you an easy-to-use higher-level API that can still interact with the base EditableImage.
A Window needs to be able to render its content on some sort of Image, so create an ImageLabel within a ScreenGui in StarterGui, with its BackgroundTransparency set to 0. Ensure that the ScreenGui is named ScreenGui and the ImageLabel is named ImageLabel. This ImageLabel will act as your primary canvas for rendering graphics. Your StarterGui hierarchy should look like this:
> StarterGui
    > ScreenGui
        > ImageLabel
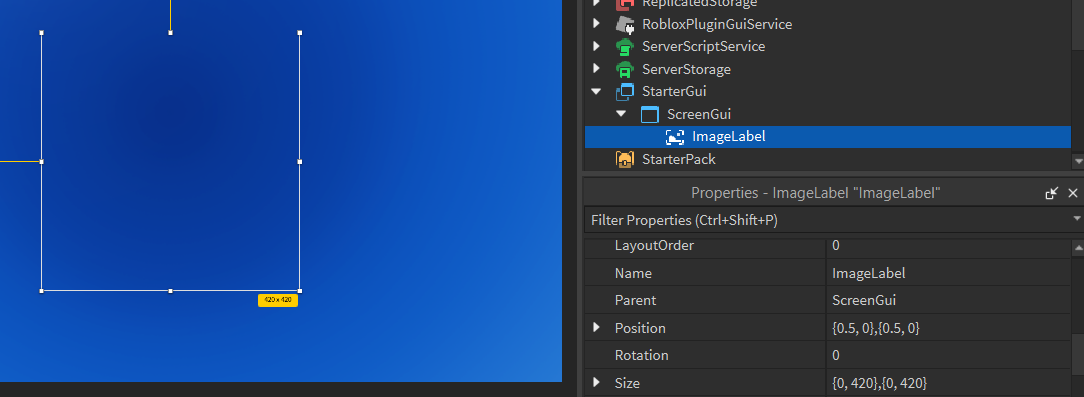
To get a better view of the ImageLabel while in-game, you can place it in the center of the screen. This will help you see the rendered graphics more clearly instead of it being in a corner of the screen. Additionally, resizing the ImageLabel to a larger size, such as 420x420, can help you see what's rendered more easily.
 In this image, the
 AnchorPoint property is set to .5, .5, with the position being .5, 0, .5, 0, and the size being 0, 420, 0, 420.
Lower resolutions cause blurred images! If you're rendering at a low resolution, or just want a pixelated look, set the ResampleMode property of your ImageLabel to Pixelated!
Creating a Window
Now that we have a canvas to work with, we can start programming. Create a LocalScript in a suitable location, such as StarterPlayer/StarterPlayerScripts.
The main OSGL module is divided into several sub-modules, each serving a different purpose. To create a Window, we need the Window sub-module. Let's import it:
local ReplicatedStorage = game:GetService("ReplicatedStorage")

local OSGL = require(ReplicatedStorage.Packages.OSGL)
local Window = OSGL.Window
The Window module offers multiple ways to create a Window. The following is an extract from the API:
Window.from: Creates an OSGL window from an existingEditableImage.Window.new: Creates an OSGL window by initializing a newEditableImageinstance at the specified location.Window.fromAssetId: Creates a window given an assetId.Window.fromBuffer: Creates a window given a buffer.
Among the available options, Window.new is the most suitable for our needs. Since we do not have an existing EditableImage, this method will create one at the specified location. The function requires an Image, with an optional WindowConfiguration object:
local ReplicatedStorage = game:GetService("ReplicatedStorage")
local Players = game:GetService("Players")

local OSGL = require(ReplicatedStorage.Packages.OSGL)
local Window = OSGL.Window

local player = Players.LocalPlayer
assert(player)

local screenGui = player.PlayerGui:WaitForChild("ScreenGui")
local imageLabel = screenGui.ImageLabel

-- Create a Window with a size of 420x420. The size can be customized as needed,
-- but it does not have to match the size of the ImageLabel. Note that Windows
-- cannot exceed the maximum size of 1024x1024.
local window = Window.new(imageLabel, { sizeX = 420, sizeY = 420 })
It's a good idea to use constants instead of hardcoded width and height numbers because we could be referring to these values a couple of times in the future:
local WIDTH = 420
local HEIGHT = 420

local window = Window.new(imageLabel, { sizeX = WIDTH, sizeY = HEIGHT })
Your full code should now look something like this:
local ReplicatedStorage = game:GetService("ReplicatedStorage")
local Players = game:GetService("Players")

local OSGL = require(ReplicatedStorage.OSGL)
local Window = OSGL.Window

local player = Players.LocalPlayer
assert(player)

-- Dimensions
local WIDTH = 420
local HEIGHT = 420

local screenGui = player.PlayerGui:WaitForChild("ScreenGui")
local imageLabel = screenGui.ImageLabel

-- Create the window
local window = Window.new(imageLabel, { sizeX = WIDTH, sizeY = HEIGHT })
By default, OSGL renders all windows at 60 FPS. You can change this value using the targetFPS property:
local window = Window.new(imageLabel, { sizeX = WIDTH, sizeY = HEIGHT })
window.targetFPS = 244
Drawing to a Window
To draw to the Window, use the Draw method, which returns a DrawingContext. To get the original Window object back, use StopDrawing:
-- Example.luau

-- Object refers to `window`
local object = window
                    :Draw() -- Open a `DrawingContext`
                    :SomeDrawingMethod() -- same as `draw.someDrawingMethod`
                    :AnotherDrawingMethod() -- same as `draw.anotherDrawingMethod`
                    :StopDrawing() -- Return the window
All methods in the Window module support method chaining. To fill the Window with a specific color, use the Clear method. OSGL uses its own custom color implementation. Import the color sub-module:
-- ...

local OSGL = require(ReplicatedStorage.OSGL)
local Window = OSGL.Window
local color = OSGL.color

-- ...

window:Clear(color.BLACK) -- Fills the window with a black RGBA color
To see the changes on the Window, you need to use the Render method. This method applies all the drawing operations to the screen:
-- ...

local OSGL = require(ReplicatedStorage.OSGL)
local Window = OSGL.Window
local color = OSGL.color

-- ...

window
    :Clear(color.BLACK) -- Fills the window with a black RGBA color
    :Render() -- Applies the changes to the screen
By calling Render, you ensure that all the drawing operations are displayed on the Window.
The full code should now look like:
local ReplicatedStorage = game:GetService("ReplicatedStorage")
local Players = game:GetService("Players")

local OSGL = require(ReplicatedStorage.OSGL)
local Window = OSGL.Window
local color = OSGL.color

local player = Players.LocalPlayer
assert(player)

-- Dimensions
local WIDTH = 420
local HEIGHT = 420

local screenGui = player.PlayerGui:WaitForChild("ScreenGui")
local imageLabel = screenGui.ImageLabel

-- Create the window
local window = Window.new(imageLabel, { sizeX = WIDTH, sizeY = HEIGHT })
window.targetFPS = 244

window
    :Clear(color.BLACK)
    :Render()
Running this code should color the entire Window black:

And that's it! You've successfully rendered to a Window in OSGL.